

Software project settings - every option explained
Software projects have their own settings dialog, separate from the one on general projects. This page walks through every section and lists each option you can customize: what it does, the choices you get, its limits and default, and who is allowed to change it.
At a glance
| What it is | The settings dialog for a single software project |
| Where to find it | Click the gear icon in the project header (tooltip Open project settings). Right after you create a project, Customize opens it too |
| Who can change it | Owners and Admins can change everything. Project Managers and Team Leads can change most sections. See who can change what |
| Guests | The gear is disabled with the message “Project settings are not accessible for guest users” |
| Plan | Most options work on every plan. A few need a paid plan or Business |
How is the dialog organized?
The left menu has three groups, then a Danger Zone at the bottom.
| Group | Sections |
|---|---|
| Project | Details, Team & access |
| Delivery | Workflow, Sprints, Estimation |
| Configuration | Integrations, Export (only shown to some roles) |
| Bottom of the menu | Danger Zone |
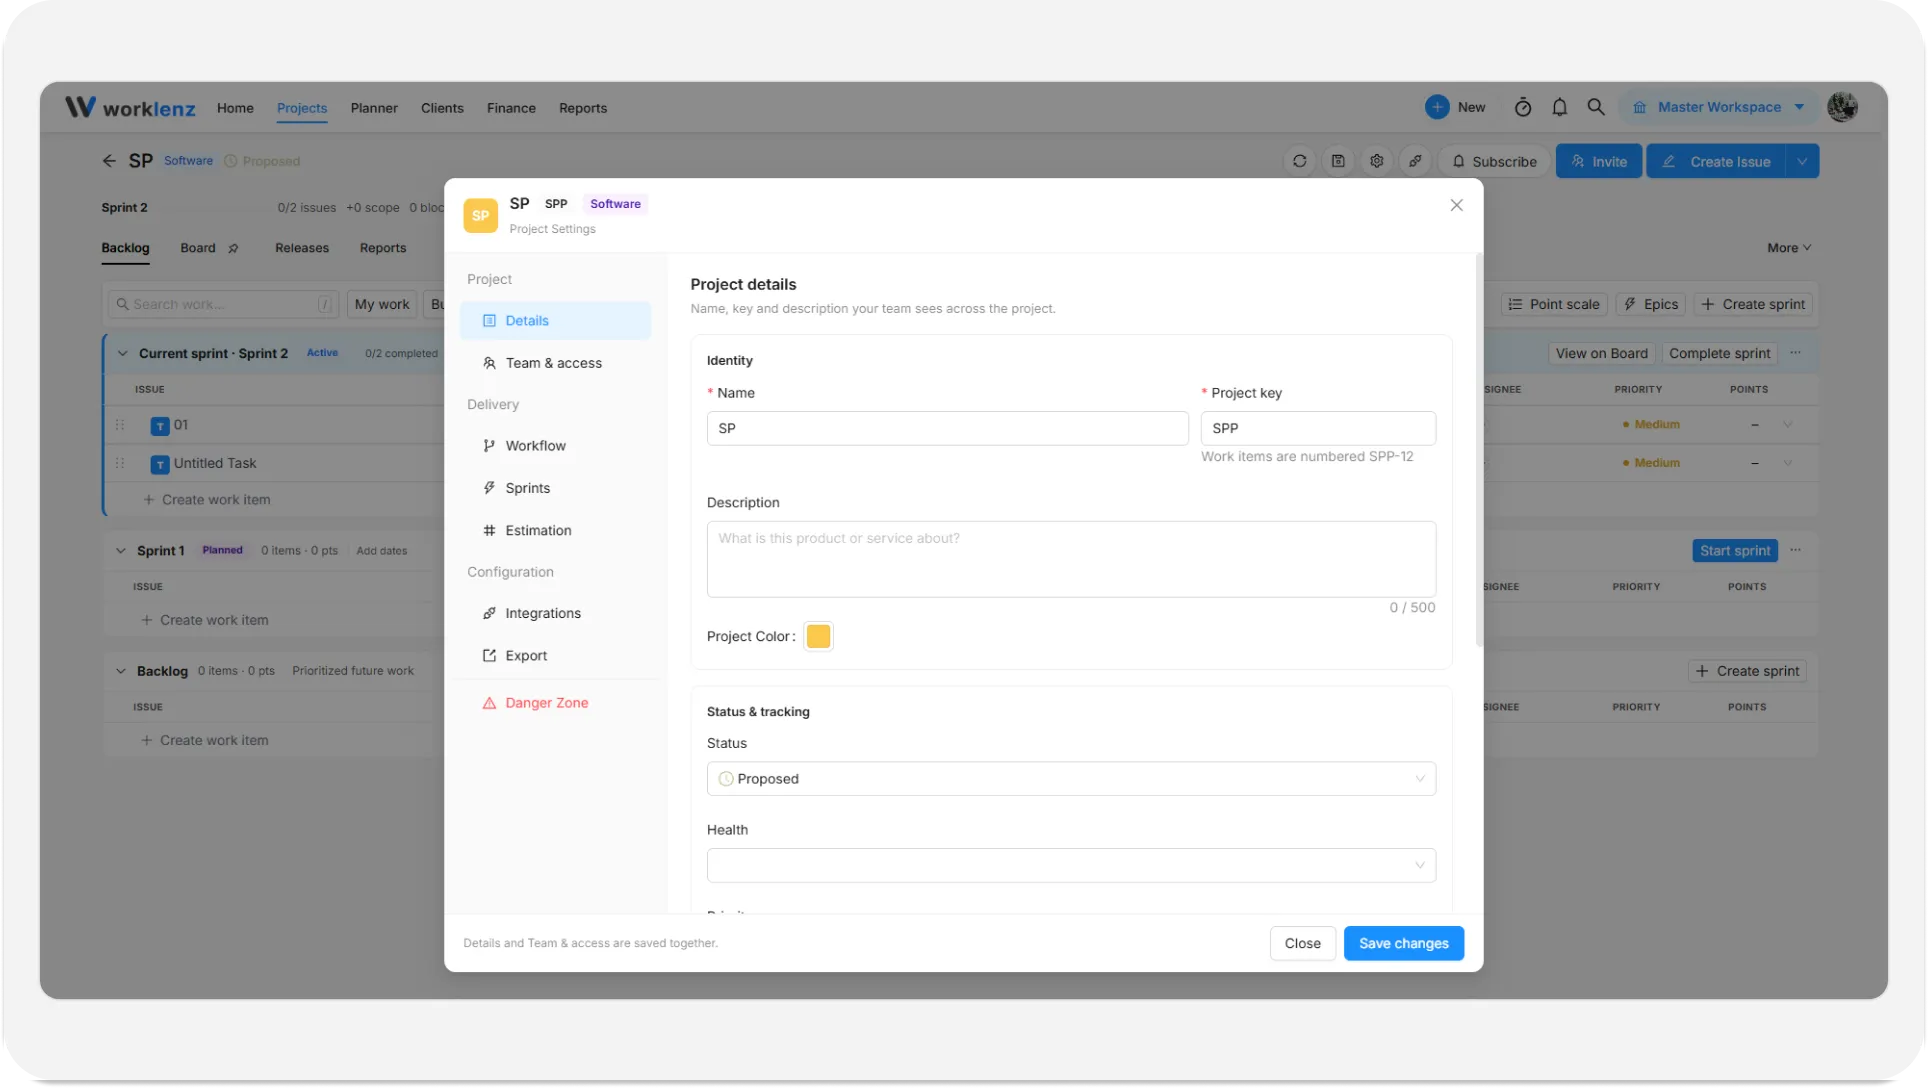
On a small screen the left menu turns into a row of tabs across the top.
Which sections save automatically?
This catches people out, so check the line at the bottom of the dialog. It tells you how the section you are in saves.
| Section | How it saves |
|---|---|
| Details and Team & access | Together, when you click Save changes. You see “Project settings saved” and the dialog closes |
| Workflow and Sprints | Automatically, the moment you change something |
| Estimation | When you click Save scale (or press Enter). The footer Save changes button is not used here |
| Integrations, Export, Danger Zone | Each action applies when you confirm it |
If you change the project key and save, the page reloads so every issue number shows the new key.
Details
Details holds three cards: Identity, Status & tracking, and Timeline. It is saved with Save changes.
Identity
| Option | What you can set | Limits and default |
|---|---|---|
| Name | The project name | Required, up to 100 characters. Names must be unique in your workspace, ignoring upper and lower case |
| Project key | The short code that starts every issue number, such as KEY-12. A live hint under the field shows the format | Required. Letters, numbers, hyphens and underscores only. Typing lowercase converts to uppercase. Keep it to 5 characters or fewer, because longer keys are refused when you save |
| Description | What the product or service is about | Optional, up to 500 characters, with a counter |
| Project Color | A color for the project, picked from a color picker | Any color. It shows in the project title and lists |
Status & tracking
These are five dropdowns. Anyone who can change settings can use them, with two limits on the Free plan.
| Option | Choices | Default | Plan |
|---|---|---|---|
| Status | Cancelled, Blocked, On Hold, Proposed, In Planning, In Progress, Completed, Continuous | Proposed | Every plan |
| Health | Not Set, Needs Attention, At Risk, Good | Not Set | Locked on Free |
| Priority | Low, Medium, High, Critical | Medium | Every plan |
| Category | Any category you already have, or a new one | None | Locked on Free (a crown icon marks it) |
| Client | Any client in your workspace, searched as you type | None | Every plan |
A few details worth knowing:
- This Status describes the whole project, such as Proposed or In Progress. It is not the same as the issue statuses you manage in Workflow.
- Category: open the dropdown and choose New Category, type a name and press Enter. If a category with that name exists already, Worklenz selects it instead of making a duplicate. A new category has a name only, with no color. Categories also appear under workspace settings.
- Client: if you type a name that does not exist, an Add … as client option appears. Choosing it creates the client and selects it. To give that client access to the portal, see add a client.
- The small question mark next to Client points you to the clients list under Settings.
Timeline
| Option | What it does | Limits |
|---|---|---|
| Start Date | Optional start of the whole project | Date picker |
| End Date | Optional end of the whole project | Cannot be earlier than the start date: “End date cannot be earlier than start date” |
The timeline is a rough window for the project. Each sprint has its own dates.
Team & access
Team & access controls who leads the project and how members create and see issues. It saves with Save changes.
Project lead
| Option | What it does | Who and plan |
|---|---|---|
| Lead | Picks one person who owns the backlog, runs sprint planning and manages project settings. Open the picker, search by name or email, select a team member. Use the clear button to remove the lead | Only Owners and Admins, on a paid plan. Everyone else sees it read-only |
| Finance access | A switch that lets this lead view and edit the Finance tab, budget and rate card. It only appears once a lead is chosen | Owners and Admins on a paid plan. On by default |
On the Free plan a banner reads “Assigning a project lead is available on paid plans” with an upgrade button.
Work item rules
| Option | What it does | Default | Plan |
|---|---|---|---|
| Assign new work items to their creator | Anyone who creates an issue is assigned to it automatically. Handy when engineers pick up the issues they log themselves | Off | Every plan |
| Only Admins and Team Leads can create and assign work items | Stops regular members creating or assigning issues. Members can still update the issues assigned to them | Off | Business |
| Members only see work items assigned to them | Members see only their own issues. Owners, Admins, Team Leads, Project Managers and Guests always see everything | Off | Every plan |
Without Business, the restriction switch is greyed out and a note says “Restricting task creation to Admins and Team Leads is available on Business and Enterprise plans” with an upgrade button. When the restriction is on and a member tries to create an issue, they see “Task creation is restricted. Please contact admin for access.”
Workflow
Workflow is where you shape the statuses that issues move through. It saves automatically. A new software project starts with six: Backlog and Todo (in To do), In Progress, In Review and Blocked (in Doing), and Done (in Done).
Statuses sit in three category cards: To do, Doing and Done. The category tells Worklenz how to treat an issue, for example whether it counts as finished in your reports.
| What you can do | How |
|---|---|
| Add a status | Click Add Status in a category, type a name (up to 50 characters) and press Enter or click Create |
| Rename a status | Click its name or the pencil icon, edit, then press Enter. Escape cancels |
| Change a status color | Click the small color square, pick a color, then click Apply |
| Move a status to another category | Drag it onto another category card |
| Reorder statuses | Drag the grip handle. The order is the order of the columns on the software board |
| Delete a status | Click the trash icon and confirm “Delete Status” |
Things to know before you change the workflow:
- Every category must keep at least one status. If you drag the last one out, you see “Cannot Move Status”.
- When you delete a status, its issues move to the first remaining status in the list, and you cannot choose which. If it matters, move the issues yourself first.
- Moving Backlog issues to Todo happens automatically when you plan them into a sprint. Renaming or deleting those two statuses may change that, so test with a copy before changing them in a busy project.
- You need settings or status permission to edit. Without it the cards are read-only.
Sprints
The Sprints section lists your sprints on two tabs, Active (planned plus the current one) and Completed. It saves automatically. The full guide is in sprints, and this table covers the settings.
| Option | What it does | Limits and default |
|---|---|---|
| Add sprint | Creates the next sprint, named “Sprint N”. It starts the day after the last sprint ends and has the same length. The first sprint starts today and runs 14 days | One click |
| More options | Lets you choose Starts on and Duration before adding | Duration of 1 to 12 weeks, or 1 to 90 days |
| Edit sprint | Opens the sprint name, goal and dates | In each sprint’s … menu |
| Start sprint | Starts a planned sprint | Greyed out with “Complete the current sprint first” while another is active |
| Complete sprint | Ends the active sprint and moves unfinished work | In the active sprint’s menu |
| Delete sprint | Removes the sprint. Its issues move to the Backlog | Cannot be undone |
| Start and complete sprints automatically | Planned sprints start on their start date and the current sprint completes after its end date. Unfinished work moves to the next planned sprint, or the Backlog. Sprints without dates are not touched | Off by default |
| Auto-archive done issues when a sprint completes | Done issues in the completed sprint are archived. Unfinished issues go where you choose | On by default |
You need settings or sprint permission to change any of this. Both switches save immediately and show “Could not update sprint settings” if something goes wrong.
Estimation
Estimation sets the story point values your team can pick when sizing issues. See story points and estimation for how to use them.
| Option | What it does |
|---|---|
| Start from a preset | Fills the value box. Fibonacci: 0, 1, 2, 3, 5, 8, 13, 21. Modified Fibonacci: 0, 0.5, 1, 2, 3, 5, 8, 13, 20, 40, 100. Powers of two: 0, 1, 2, 4, 8, 16, 32. Linear (1-10): 1 to 10 |
| Point values | Type your own comma-separated numbers. A preview of the values appears below as you type |
| Reset to default | Puts the default back in the box: 0, 1, 2, 3, 5, 8, 13, 21. You still need to click Save scale |
| Save scale | Saves the scale. It is only enabled when the values are valid and different from what is saved |
Limits: up to 30 values, each from 0 to 1000, no negatives. Duplicates are removed and the values are sorted for you. Invalid input shows “Use comma-separated, non-negative numbers only.” Changing the scale does not erase points already set on issues.
Integrations
Integrations connects the project to outside tools. Actions apply as soon as you confirm them.
| Integration | What it does | Who and plan |
|---|---|---|
| GitHub | Shows branches, pull requests and commits on the project’s issues, and can update statuses from GitHub events. Pick a repository and click Link, set its base branch, and choose what happens when a branch is created or a pull request is opened or merged | Owners and Admins connect GitHub for the workspace. People with settings permission link repositories. Not locked to a plan in this dialog. See GitHub for software projects |
| Slack | Sends task, status and comment updates to Slack channels | Business plan |
| Microsoft Teams | Shown as “coming soon” and cannot be used yet | Not available |
Export
Export downloads the project’s data. The Export section only appears for Owners, Admins, Project Managers and Team Leads, and it needs the Business plan. On other plans a “Business Plan Required” notice replaces the options.
| Option | What it does |
|---|---|
| Tasks | Includes the issues. Selected by default |
| Task Comments | Includes the comments. Off by default |
| Files | Includes the attachments. Off by default |
| Export | Starts the export. It is disabled until at least one option is ticked |
How the download arrives depends on what you pick:
- Tasks only gives you a CSV file, and comments only gives you a CSV file. Any mix of two or more items, or including Files, arrives as a ZIP file.
- Without Files, the download starts right away.
- With Files, the export runs in the background. You see “Preparing your export” and the Recent exports list updates until it shows Ready. Only one background export can run per project at a time. The files bundle is limited to 250 MB.
- Recent exports lists each export with its status (Processing, Ready, Failed or Expired). Download links expire after 7 days.
The export does not include story points, issue type, epic or release.
Danger zone
The Danger Zone has one action: Delete the project. Only Owners and Admins can use it. Everyone else sees “No permission”.
Clicking Delete opens Confirm Project Deletion. It warns that deleting is permanent and removes all issues and subtasks, assignments and work logs, comments and attachments, and project members and settings. Click Delete Project to confirm, or Cancel. There is no typed confirmation, so read the warning before you click. You land on the Projects page with a message that the project was permanently deleted.
Who can change what
| Section | Owner / Admin | Project Manager | Team Lead | Member |
|---|---|---|---|---|
| Details | Yes | Yes | Yes | View only |
| Team & access: project lead and finance access | Yes (paid plan) | No | No | No |
| Team & access: work item rules | Yes | Yes | Yes | View only |
| Workflow | Yes | Yes | Yes | No |
| Sprints | Yes | Yes | Yes | No |
| Estimation | Yes | Yes | Yes | View only |
| Integrations (link repositories) | Yes | Yes | Yes | View only |
| Export | Yes (Business) | Yes (Business) | Yes (Business) | Hidden |
| Danger Zone | Yes | No | No | No |
If you open the dialog without settings permission, a yellow “No permission” banner appears and the fields are disabled. Guests cannot open settings at all.
Which options depend on your plan?
| Option | Free | Pro | Business |
|---|---|---|---|
| Name, key, description, color, status, priority, client, timeline | Available | Available | Available |
| Health and Category | Locked | Available | Available |
| Project lead and Finance access | Locked | Available | Available |
| Only Admins and Team Leads can create and assign work items | Locked | Locked | Available |
| Workflow, Sprints, Estimation, GitHub | Available | Available | Available |
| Slack | Locked | Locked | Available |
| Export | Locked | Locked | Available |
Best practices
- Click Save changes before you close the dialog, because Close, the X and clicking outside all discard unsaved edits in Details and Team & access.
- Settle the project key early, because changing it makes every issue number show the new key.
- Move issues yourself before deleting a status, because its issues go to the first remaining status in the list and you cannot choose which.
- Test renames or deletions of Backlog and Todo on a copy first, because moving issues from Backlog to Todo when you plan them into a sprint depends on those statuses.
- Export what you need before you delete a project, because deletion is permanent and removes all issues, comments, attachments, members and settings.